Pushing my rational mind aside as it was trying to re-educate me on the science of it all, (like in paper marbling the dye, in this case the nail polish, sits on top of the water and after a design is created, an object is passed through the dye and into the water where the design stays on the object.) I instead gave into the little girl voice inside screaming "Ooo Pretty!" and decided I had to try it. It seemed like a quick way to get some dramatic results.
I hit up my local dollar store to track down some cheap nail polish to experiment with. After a little bit of trial and error and another hour or so of watching tutorials, here are the steps for what I did (please note, I took pictures through the whole process so I'm not always showing the same nail in the pictures):
1 ) Pick the colors you want to use for your design. For this design, I decided on with a medium blue and white.
2 ) Apply a base coat of clear polish to your nail. This keeps any colors from staining your nails and will give the next layer something to stick to.
3 ) Using 2 pieces of tape I masked off my finger so that the rest of the polish wouldn't coat it when I applied the marbling to my nail. Put one small piece of tape across the base of your cuticle and around your finger and take a longer piece and wrap it in a "U" shape around the tip of your finger and both sides of your nail so that it sticks to the first piece.
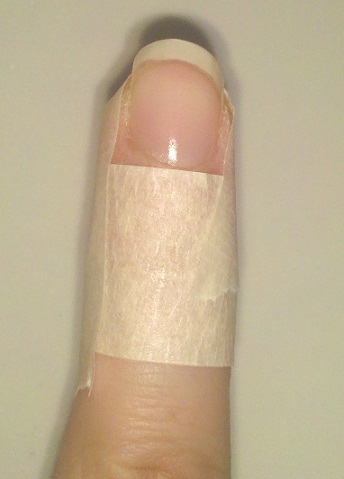
4 ) I didn't want my nail to show through into the design so I also applied one thin coat of the same white polish I was using for my design over the clear base coat.
5 ) You need a small cup of room temperature filtered water (I used distilled), your polishes, a long needle or orange stick, some paper towel, and some cotton swabs.

6 ) I filled my 3oz plastic cup almost to the top with the distilled water. Begin building your bulls eye pattern one drop at a time but work quickly. If your drops aren't spreading, gently tap the sides of the cup. This will help distribute the polish.

7 ) Begin your design by anchoring one of the sides of the design to the side of the cup by dragging the needle through and wiping it on the inside edge of the cup.

8 ) Continue dragging the needle through the design, sometimes from the center out, sometimes from the outside edge towards the center, draw circles, or whatever makes you happy, until you get a pattern that you like.


9 ) When you're ready, aim your nail so it will touch down directly onto the part of the pattern that you want and push your finger straight down through the pattern and into the water making sure you don't touch the edge of the cup or lift your finger out of the water.


10 ) Hold your finger in the water and blow across the top of the remaining polish, when it dries (about 4-8 seconds) use a cotton swab to wipe the polish off of the top of the water. This makes it safe for you to lift your finger without ruining the design.
11 ) Lift your nail out of the water and behold your success! Or utter failure, but hey, that's what practice is for.
12 ) Remove the tape and use a cotton swap dipped in acetone or nail polish remover to clean up the polish around the nail.


13 ) Finish with a clear coat to seal and protect.
I really enjoyed playing with this method. Watch a few tutorials, haul out your massive nail polish collection and try it for yourself!
Make sure and share your experiences, I'd love to hear about them!
Thanks!
No comments:
Post a Comment